
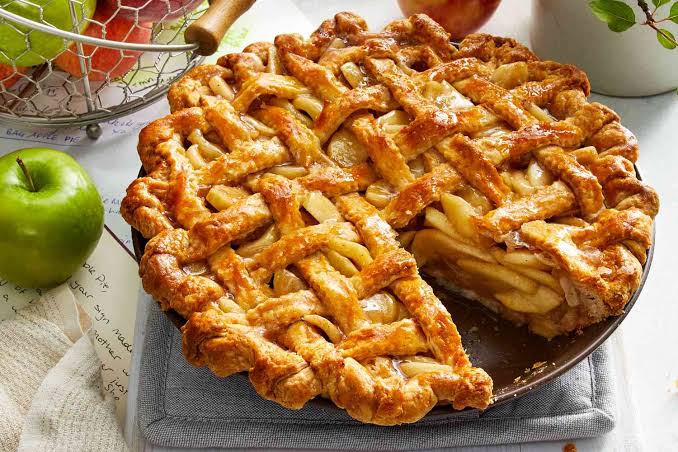
A truly great apple pie has a buttery, flaky crust that shatters at the fork, a filling that’s tender but not mushy, perfectly spiced without being overwhelming, and a bottom crust that stays crisp rather than soggy. This guide covers every decision — the right apples, the right crust, the right technique — so you get it right the first time.
Thank you for reading this post, don't forget to subscribe!Quick Answer: Classic Apple Pie Recipe
Prep time: 45 minutes | Chill time: 1 hour | Bake time: 55–65 minutes | Total: ~2.5 hours Serves: 8 | Difficulty: Intermediate
The short version: Make an all-butter pie crust, rest it in the fridge, fill it with a spiced apple mixture, top with a second crust, and bake at high heat until deeply golden and bubbling. The details below make all the difference.
Why Most Homemade Apple Pies Disappoint (And How to Fix It)
Most people who’ve made apple pie at home know the problem: the filling shrinks away from the crust, leaving a gap; the bottom crust is soggy; the apples turn to mush; the filling is runny and spills everywhere when you slice it.
None of these problems are inevitable. They all have specific causes and specific fixes:
| Problem | Cause | Fix |
|---|---|---|
| Soggy bottom crust | Filling moisture soaks through unbaked dough | Blind bake the bottom or use a thickener correctly |
| Runny filling | Too much liquid, wrong thickener | Use cornstarch or flour; drain apples after salting |
| Apples turn to mush | Wrong apple variety or overcooked | Use firm apples; don’t pre-cook filling |
| Gap between filling and crust | Apples shrink during baking | Pre-cook filling briefly to reduce volume |
| Pale, soft crust | Oven not hot enough, no egg wash | Start at 425°F, use egg wash + sugar |
| Bland filling | Under-seasoned, no acid | Use brown sugar, cinnamon, nutmeg, lemon juice |
| Crust falls apart | Butter too warm, overworked gluten | Keep everything cold; handle dough minimally |
This guide addresses every one of these.
Choosing the Right Apples
The single most important decision in apple pie is the apple. Different varieties behave very differently under heat — some hold their shape, some collapse into applesauce, and some land somewhere in between.
Apple Variety Guide
| Apple | Flavor | Texture After Baking | Best For |
|---|---|---|---|
| Granny Smith | Tart, sharp | Firm, holds shape well | Structure and tartness — the gold standard |
| Honeycrisp | Sweet-tart, complex | Holds well with slight softness | Flavor complexity |
| Braeburn | Sweet-tart, spiced | Holds shape beautifully | All-round excellent pie apple |
| Golden Delicious | Mild, sweet | Softens significantly | Sweetness — best blended with tart |
| Cortland | Mildly tart | Medium — semi-holds | Good blend apple |
| Pink Lady | Sweet-tart, floral | Firm, holds shape | Flavor and structure |
| McIntosh | Tart, aromatic | Breaks down easily | Avoid as main apple |
| Red Delicious | Sweet, bland | Mushy — avoid | Never use for pie |
The Professional Approach: Blend Two Varieties
The best apple pie almost always uses a blend of two apple types — one for structure, one for flavor:
- Granny Smith + Honeycrisp — the most popular combination: tartness and structure from the Granny Smith, sweetness and complexity from the Honeycrisp
- Granny Smith + Golden Delicious — classic American combination; tart-sweet balance
- Braeburn + Pink Lady — British-style; both hold shape and have complementary flavor profiles
Amount: For a standard 9-inch pie, use 6–7 medium apples (about 3 lbs / 1.35 kg), peeled, cored, and sliced.
The Pie Crust: All-Butter vs. Shortening vs. Lard
The crust debate has strong opinions on every side. Here’s the honest comparison:
| Fat | Flavor | Flakiness | Ease of Handling |
|---|---|---|---|
| All-butter | Rich, complex, buttery | Very flaky when done right | Requires cold technique |
| All-shortening | Bland | Extremely flaky, very tender | Easier to handle |
| All-lard | Savory richness | Most flaky, most tender | Requires planning ahead |
| Butter + shortening (50/50) | Good flavor + flakiness | Excellent | Best of both — most forgiving |
Recommendation: For home bakers, the butter + shortening blend gives you the best result with the most forgiveness. For the most impressive crust with maximum flavor, go all-butter and keep everything very cold.
This recipe uses all-butter — the technique is precise but the payoff is unmatched.
The Complete Apple Pie Recipe
Ingredients
For the All-Butter Pie Crust (double crust)
- 300g (2½ cups) all-purpose flour, plus extra for dusting
- 1 tbsp granulated sugar
- 1 tsp fine salt
- 230g (1 cup / 2 sticks) unsalted butter, very cold, cut into ½-inch cubes
- 6–8 tbsp ice water (have more ready)
- 1 tbsp apple cider vinegar (keeps the crust tender — a professional trick)
For the Apple Filling
- 900g (3 lbs / about 6–7 medium) apples — half Granny Smith, half Honeycrisp
- 150g (¾ cup) granulated sugar
- 50g (¼ cup packed) brown sugar
- 2 tbsp cornstarch (or 3 tbsp all-purpose flour)
- 1½ tsp ground cinnamon
- ¼ tsp ground nutmeg (freshly grated if possible)
- ¼ tsp ground allspice
- Pinch of ground cloves
- ¼ tsp fine salt
- 1 tbsp fresh lemon juice
- 1 tsp vanilla extract
- 2 tbsp unsalted butter, cut into small pieces (dotted over filling)
For Assembly
- 1 egg + 1 tbsp milk (egg wash)
- 1–2 tbsp coarse sugar (turbinado or demerara — for sparkle and crunch)
Step 1: Make the Pie Crust
The golden rule of pie crust: keep everything cold.
Cold butter creates steam during baking — those steam pockets are what makes a crust flaky. Warm butter gets absorbed into the flour, producing a dense, crumbly result with no layers.
Instructions:
- Whisk flour, sugar, and salt together in a large bowl.
- Add the cold butter cubes. Using a pastry cutter, two forks, or your fingertips (work quickly — warmth from your hands is the enemy), cut the butter into the flour until the mixture resembles coarse crumbs with some pea-sized butter pieces remaining. Those visible chunks of butter are flakiness in the making — don’t overwork.
- Combine the ice water and apple cider vinegar. Add 6 tbsp to the flour mixture, one tablespoon at a time, mixing gently with a fork after each addition. The dough is ready when it just holds together when you squeeze a handful — it should look shaggy, not smooth. If it’s too dry, add 1–2 more tbsp of ice water.
- Divide the dough into two equal discs (not balls — a disc shape chills faster and rolls more evenly). Wrap each tightly in plastic wrap.
- Refrigerate for at least 1 hour, preferably 2. This step is non-negotiable — it relaxes the gluten (making the dough easier to roll without shrinking) and re-solidifies the butter.
Can be made up to 3 days ahead and refrigerated, or frozen for up to 3 months.
Step 2: Prepare the Apple Filling
- Peel, core, and slice the apples to about ¼-inch thickness. Consistent thickness ensures even cooking — too thick and some pieces remain crunchy; too thin and everything turns to mush.
- Toss apples with both sugars, cornstarch, spices, salt, lemon juice, and vanilla in a large bowl. Mix until every slice is evenly coated.
- Let the mixture sit for 15–20 minutes. The sugar will draw moisture out of the apples — you’ll see liquid pooling at the bottom of the bowl. This is important.
- Drain the excess liquid into a small saucepan. This is the key step most recipes skip — it removes the liquid that would otherwise make your filling runny and your bottom crust soggy. Simmer the drained liquid over medium heat for 3–4 minutes until it thickens slightly into a syrup. Pour this back over the apples and toss to combine.
Why this works: You’ve just removed the raw liquid that would have steamed your bottom crust to sogginess. By cooking it briefly and returning it as a thickened syrup, you get maximum flavor with controlled moisture.
Step 3: Roll the Crust
- Remove one disc of dough from the fridge. Let it sit at room temperature for 5 minutes — cold dough cracks when you start rolling. It should be pliable but still cold.
- On a lightly floured surface (or between two sheets of parchment paper — no sticking, no extra flour), roll the dough from the center outward in all directions, rotating the disc a quarter turn after every few passes. Roll to a 12-inch circle, about ⅛-inch thick.
- Carefully transfer to a 9-inch pie dish — the classic method is to roll the dough loosely around your rolling pin and unroll it over the dish. Gently press into the bottom and sides without stretching. Stretching the dough causes it to shrink back during baking.
- Trim any overhang to about 1 inch beyond the rim. Refrigerate while you roll the top crust.
- Roll the second disc to the same size. Keep it flat on a baking sheet, covered, in the fridge until ready.
Step 4: Fill and Top the Pie
- Preheat your oven to 425°F (220°C). Place a baking sheet on the lowest rack — it will catch any drips and also helps conduct heat to the bottom crust.
- Remove the lined pie dish from the fridge. Pile the apple filling in generously — heap it high, because the apples compact significantly during baking. Dot the surface of the filling with the small pieces of butter.
- Lay the top crust over the filling. Trim to match the bottom crust overhang, then fold the edges of both crusts under together and crimp — press with a fork, or pinch with your fingers into a fluted pattern. Make sure the edge is well sealed to prevent filling from bubbling out the sides.
- Cut vents in the top crust — at least 4–6 slits or a decorative cutout pattern. These are essential: they allow steam to escape, which prevents the top crust from bubbling up and separating from the filling.
- Apply the egg wash — brush the entire top surface and crimped edge with the egg-milk mixture. This is what produces the deep golden color.
- Sprinkle generously with coarse sugar — turbinado or demerara adds crunch, sparkle, and a pleasant sweetness to the crust surface.
- Refrigerate the assembled pie for 15–20 minutes before baking — this firms up the butter in the crust again and reduces shrinkage.
Step 5: Bake the Pie
Two-temperature baking is the professional method — high heat sets the structure and creates color, lower heat finishes the interior without burning.
- Bake at 425°F (220°C) for 20 minutes — the initial high heat sets the crust quickly and begins the caramelization that creates color and flavor.
- Reduce to 375°F (190°C) and bake another 35–45 minutes — until the crust is deep golden brown all over and the filling is visibly bubbling through the vents. If the edges begin to brown too fast, cover them loosely with strips of foil or a pie shield.
- The filling must bubble. This is the most important sign of doneness — not the color of the crust. Bubbling indicates the filling has reached a temperature high enough to activate the cornstarch thickener. A pie pulled before the filling bubbles will have a loose, runny interior. Bubbling through the vents = done.
Total bake time: 55–65 minutes
Step 6: Cool — The Hardest Part
Cool the pie for a minimum of 3–4 hours before slicing.
This is where most people make the final mistake. A freshly baked apple pie is a liquid mess inside — the filling needs time to set as it cools. Slicing too soon means the filling pours out rather than holding in a clean wedge.
Cool on a wire rack at room temperature. After 4 hours, the filling will have set to a sliceable consistency. After overnight cooling, it slices cleanly and beautifully.
Serving tip: Warm individual slices briefly in a 300°F oven for 10 minutes if you prefer warm pie — this is better than slicing a hot pie and losing the filling.
How to Serve Apple Pie
Apple pie is one of those dishes where the accompaniment genuinely completes the experience:
- Vanilla ice cream — the classic American pairing; the cold ice cream against warm pie creates a textural and temperature contrast that’s genuinely extraordinary
- Whipped cream — lighter than ice cream; lightly sweetened, flavored with vanilla
- Sharp cheddar cheese — a New England tradition that sounds unusual but makes sense — the saltiness and tang of aged cheddar cuts through the sweet filling remarkably well
- Crème fraîche — slightly tangy, rich, and elegant; the French approach
- Caramel sauce — drizzled over the slice, doubles down on the apple-caramel flavor profile
Apple Pie Variations Worth Trying
Dutch Apple Pie (Streusel Topping)
Replace the top crust with a crumble topping — butter, flour, brown sugar, cinnamon, and oats combined into a rough mixture and scattered over the filling before baking. Crunchier, richer, and significantly easier than a double crust.
Streusel topping:
- 100g (¾ cup) all-purpose flour
- 100g (½ cup packed) brown sugar
- 1 tsp cinnamon
- 85g (6 tbsp) cold unsalted butter, cubed
- 50g (½ cup) rolled oats (optional)
Cut butter into dry ingredients until crumbly. Scatter over filling. Bake as directed.
Caramel Apple Pie
Add 3 tbsp of caramel sauce (store-bought or homemade) to the apple filling before pouring into the crust. The caramel deepens the flavor and produces a richer, more complex filling. Drizzle more caramel over each slice when serving.
Brown Butter Apple Pie
Brown 2 tbsp of butter in a pan until it smells nutty and turns amber. Cool slightly, then add to the filling along with the regular butter. Brown butter adds a deep, toasty flavor dimension that takes the filling from good to extraordinary.
Apple and Pear Pie
Replace one-third of the apples with firm pears (Bosc or Anjou). Pears are softer and sweeter than apples — they break down more during baking, creating a softer, more jammy filling that complements the firmer apple pieces beautifully.
Make-Ahead and Storage Guide
| Element | Make-Ahead | Storage |
|---|---|---|
| Pie crust dough | Up to 3 days | Fridge, wrapped tightly |
| Rolled crust in dish | 1 day ahead | Fridge, covered |
| Apple filling | Up to 24 hours | Fridge, drain before using |
| Fully assembled unbaked pie | Up to 1 day | Fridge |
| Fully baked pie | Up to 2 days | Room temperature, loosely covered |
| Baked pie (longer storage) | Up to 4 days | Refrigerated |
| Frozen baked pie | Up to 4 months | Tightly wrapped in freezer |
Freezing tip: Apple pie freezes beautifully. Freeze the fully baked, completely cooled pie tightly wrapped. Reheat from frozen at 375°F (190°C) for 45–60 minutes until heated through and the crust is crisp again.
Frequently Asked Questions
What are the best apples for apple pie? Granny Smith is the most reliable single apple for pie — its firm texture holds up during baking and its tartness balances the sugar in the filling. The best result, however, comes from blending two varieties: Granny Smith with Honeycrisp or Golden Delicious gives you both structure and flavor complexity. Avoid soft apples like McIntosh or Red Delicious — they collapse into mush.
How do you keep the bottom crust from getting soggy? Three techniques combined produce the best result: drain the excess liquid from your apple filling before adding it to the crust; start baking on a preheated baking sheet on the lowest rack to conduct maximum heat to the bottom; and bake until the filling is truly bubbling, which activates the thickener and reduces liquid. Brushing the bottom crust with egg white before filling also creates a moisture barrier.
Why is my apple pie filling runny? A runny filling is almost always caused by one of three things: not enough thickener (use 2 tbsp cornstarch per 3 lbs of apples), not draining the excess liquid released by the apples after adding sugar, or not baking the pie until the filling is actively bubbling — the bubbling is what activates the cornstarch. All three factors together produce a perfectly set filling.
Can I make apple pie ahead of time? Yes — apple pie is an excellent make-ahead dessert. The fully baked pie keeps at room temperature for 2 days or refrigerated for 4 days. It also freezes well for up to 4 months. The crust dough can be made up to 3 days ahead and refrigerated, or 3 months ahead and frozen.
What temperature should I bake apple pie at? Start at 425°F (220°C) for the first 20 minutes — this high heat sets the crust quickly and starts the browning process. Then reduce to 375°F (190°C) for the remaining 35–45 minutes. This two-temperature method produces a deeply golden crust without burning the edges, while giving the filling enough time to cook through and bubble.
How do I get a golden brown crust? Three things produce a deeply golden crust: an egg wash (whole egg beaten with a splash of milk, brushed over the top), coarse sugar sprinkled over the egg wash, and sufficient baking time. The egg wash provides the proteins that brown; the sugar caramelizes; the temperature creates color. A pale pie is almost always a pie that wasn’t baked long enough.
Why does my apple pie have a gap between the filling and the top crust? This gap forms because the apples shrink significantly during baking, pulling away from the top crust which has already set in shape. To prevent it, pile the filling as high as possible before putting the top crust on — much higher than looks reasonable, because the apples will compact dramatically. Alternatively, pre-cook the filling briefly on the stovetop before using it, which reduces the volume before baking.
Quick-Reference Summary
| Step | Key Detail | Most Common Mistake |
|---|---|---|
| Apple choice | Blend Granny Smith + Honeycrisp | Using soft apples (Red Delicious, McIntosh) |
| Crust fat | Very cold butter, minimal handling | Warm butter, overworking the dough |
| Crust rest | 1–2 hours in fridge after making | Skipping the rest — dough shrinks |
| Filling liquid | Drain after salting, reduce and return | Leaving excess liquid in — soggy crust |
| Thickener | 2 tbsp cornstarch per 3 lbs apples | Too little = runny filling |
| Fill amount | Heap it high | Flat filling = big gap after baking |
| Oven temp | 425°F for 20 min, then 375°F | Single temp throughout |
| Doneness | Filling must bubble through vents | Pulling before filling bubbles |
| Cooling time | Minimum 3–4 hours | Slicing hot = filling pours out |
| Serving | Warm individual slices, not whole pie | Reheating the whole pie |
The Bottom Line
A perfect apple pie is not complicated — but it is deliberate. Every step has a reason: the cold butter creates flakiness, the rested dough prevents shrinking, the drained filling prevents sogginess, the two-temperature bake creates color without burning, and the cooling time sets the filling into something sliceable and beautiful.
Follow the steps in order, keep your butter cold, use the right apples, and let the pie cool completely before you slice it. Do those things and what comes out of your oven will be better than anything from a bakery — because it will taste like something you made from scratch, with your own hands, in your own kitchen.
That is what apple pie is supposed to be.
Made this recipe? Tell us in the comments which apple combination you used and how it turned out.